|
||
| Follow @AppleSoft_BASIC | ||
20 lessons to teach your 12-year old how to start programming - and give them a start with some important programming techniques, even if they do not have anyone around to provide tutoring.Why BASIC? |
||
| Please Note: even though I encourage you to try any examples provided in this tutorial, all materials on this page, including the BASIC source code, are copyrighted and cannot be reproduced somewhere else without explicit reference to this page. | ||
What this tutorial is NOT
| ||
| A short disclaimer: What this tutorial is NOT | ||
| This tutorial is not BASIC or Applesoft BASIC reference or a manual. In this tutorial I am trying to teach a young person how to start programming. And I am using Applesoft BASIC as a tool to accomplish this goal. I do explain how BASIC programs work because I think it's important, but I don't even cover all commands and certainly don't dwell into all nuts and bolts of ApppleSoft BASIC. For this, you should use official manuals and references. Some of them can be found online, some can be purchased (just type Applesoft BASIC on amazon.com and you will find plenty!). | ||
| Let's get started: BASIC program building blocks | ||
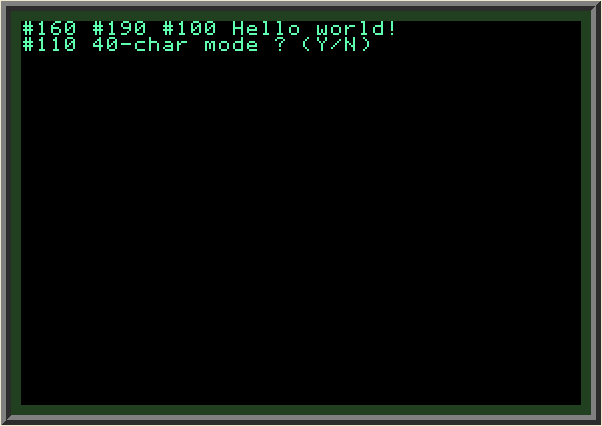
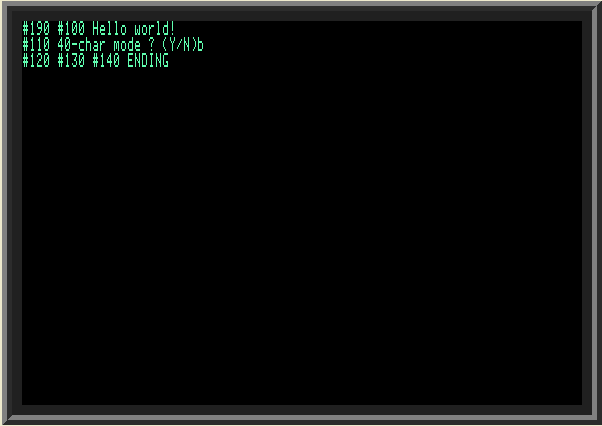
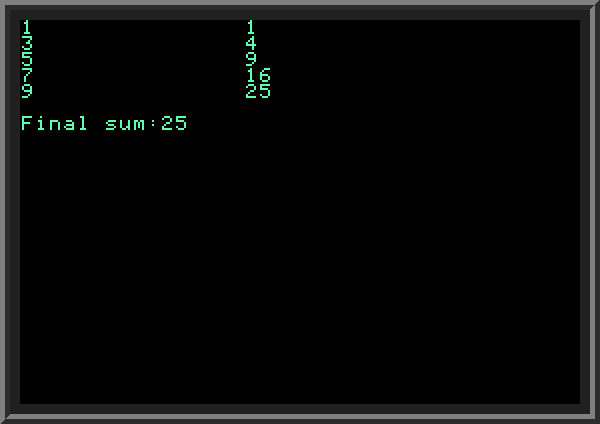
Please use this online simulator to program in Applesoft BASIC and run any examples from this tutorial.Any Applesoft BASIC program consists of a number of lines, each beginning with a non-negative integer number (referred to simply as "line number"). Empty lines are also allowed and are frequently used in this tutorial to visually separate code sections. When BASIC program runs, it is normally executed according to the line numbers, in the ascending order.When program is created, line numbers are typically separated by 10. It is common to see lines numbered 10, 20, 30, 40 and so on. This is done on purpose: often you will need to insert a new line (or several new lines) between already existing ones. If there's a space left between the line numbers, it's easier: we can put a new line number 15 between existing lines 10 and 20. If we used 1, 2, 3 as original lines, we would have to re-number all of them in order to insert just one new line between lines 1 and 2. Some programmers prefer making line numbers multiple of 20: 20, 40, 60, 80 and so on, to allow even more space for inserting new lines. The following small program prints all Fibonacci numbers from 1 to 5000. All line numbers are spaced by 10, except for line 05. It was added at the end (when the program was already written) to include the program description. Example 1.1 | ||
Fibonacci numbers program output: 
| ||
|
All line numbers must be unique. If you accidentally include two or more lines with the same number, BASIC will run only the first such line it will find in the program text. As a result, you may find your program not running as you expect.
Important Note: when inserting new lines, try keeping line numbers in order. In other words, don't include line number 55 between lines 40 and 50. Include line 55 between lines 50 and 60. Your program will be (normally) executed according to line numbers (not according the order they appear in text). Putting a line number that is out of order will not result in any warning but will most definitely cause a confusion to anyone looking at your program and trying to understand its logic. More often than not it will be you. Following the line numbers, in each line of the program we can use special commands (such as HOME, FOR..TO, IF..THEN, NEXT, GOTO, GOSUB, RETURN, INPUT, LET, PRINT, ONERR, END, etc.) which tell the program what to do. Each of these commands has a special meaning. Don't try to memorize them right away - you will learn them gradually as you learn BASIC with this tutorial. A single line can contain multiple commands separated by colon. Also, you can include a comment by adding REM command and placing text after it. REM commands and comments themselves are ignored when program runs; however they are useful for description of what we want to do (for other programmers or for ourselves). Leaving meaningful comments in your program is a good habit, regardless of which language you are programming in. Most examples in this tutorial use comments to provide a description of what is being done. |
||
| BASIC example: Euclidean algorithm for finding the Greatest Common Divisor. | ||
| In this section we will look at the BASIC program for finding the greatest common divisor (or GCD) of two natural numbers. The method for finding GCD is known as the Euclidean algorithm. The two numbers for which we want to find the GCD are denoted as variables A and B.
Let's look how this is done in BASIC, line by line: Example 2.1 | ||
| ||
| ||
Below is the result: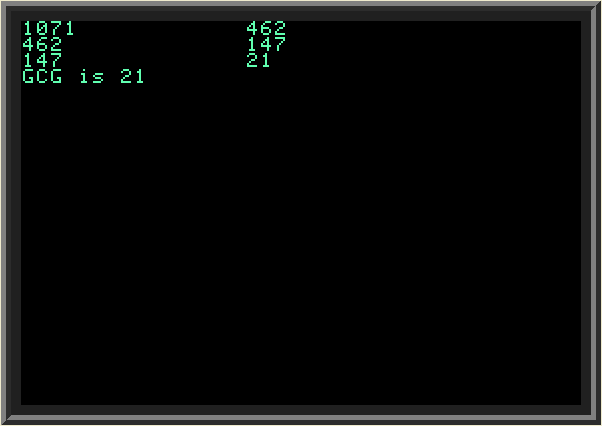
|
||
| Getting user input with INPUT command. | ||
|
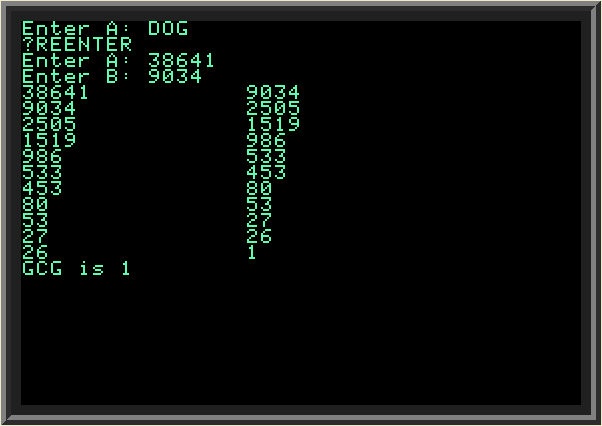
In out recent example we calculated the greatest common divisor of numbers 1071 and 462. What if we need to calculate the GTD for a different pair of numbers? We can change our BASIC program on line 20, to enter new values of A and B, but a much better approach is to have the program itself ask the user to enter A and B. For this, BASIC has INPUT command. INPUT is followed by one or more argument which indicate the variables to fill with user-supplied values. Here is the modified Euclidean algorithm program which gets A and B from the user:
Example 2.2 | ||
| ||
| Here we changed line 20 to include two INPUT commands for variables A and B. To make the program more user-friendly (easier to understand) INPUT command can optionally provide text explaining the user what type of input it expects. This text is followed by a semicolon and corresponding variable name. In our case we just show the user that we want variables A and B. Note: Applesoft BASIC is smart enough to ask the user to re-enter the value if she enters a non-numeric value. This is because our variables A and B are declared as numeric (in order to make them accept strings, not just numbers, we have to append a dollar sign to their name; but in our case we need numbers). | ||
| ||
| Before we proceed with finding the GCD value, we still have to check for A and B being valid: they both have to be natural numbers, but the user could have entered any numbers A and B. This check is done on new line #25. If condition is not met, we clear the screen (with HOME command) and return to line 20. | ||
| IF command and boolean operators AND, OR, NOT | ||
| The IF command we used in Example 2.1 (LINE 30 and 70) and Example 2.2 (LINE 25, 30 and 70) earlier checks for a logical condition and instructs BASIC to run the commands following the condition (after THEN keyword) or when IF is followed by GOTO, jump to a corresponding line in program - but only when this condition is met (equals to true). The conditions we used in Example 2.1 were simple: on line 30 we compared values of variables A and B. When A is smaller than B, we instructed BASIC to swap values of A and B. On line 70 we compared B and zero. If B is greater than zero, program continues from line 40.
Note: all commands following THEN keyword and until the end of the current line are executed when condition is true in Applesoft BASIC. If condition is not true, all commands until the end of the line are skipped. In Example 2.2 above both commands HOME and GOTO 20 are executed or skipped, depending on result of the condition on LINE 25. In example 2.2 on line 25, we used a more complex condition, involving boolean operator OR. This IF command checks if any of the statements separated by OR keyword is true. In this case we check if A is less or equal than zero, or B is less than equal than zero. If any is true we want to ask user to re-enter the values; also we check for both A and B being integer numbers. Another boolean operator, "AND", checks for all (as opposed to any, in case of OR) conditions separated by AND keyword for being true. The third boolean operator supported by BASIC, "NOT", negates (turns true into false and false into true) the condition listed after the NOT keyword. We can re-write the IF statement in example 2.2 using a combination of AND and NOT operators: | ||
| ||
| On LINE 25 above we replaced every OR keyword with AND, changed every condition previously separated with OR to the opposite one,
and put NOT operator in front of the whole IF expression.
Conditions using boolean operators can get quite complex. Below for your study is a program demonstrating how they work, with output: | ||
| ||
| ||
| Suggested exercise:modify the program above to take values of A and B from user (via INPUT command), and examine the program output. | ||
| AppleSoft BASIC missing IF-THEN-ELSE construct | ||
| Often in our program we want to execute one set of commands following IF-THEN when condition is met, and a different set of commands otherwise. In most modern languages
and in other versions of BASIC, there is an IF-THEN-ELSE construct which is specifically designed for this. Unfortunately, AppleSoft BASIC has no such construct; however there are two ways to get around this problem: one is by using GOTO; another is by using a temporary variable. Let's look at a particular example.
In our program we ask user for an input value A. If A is less than 10, we want to add 10 and print new value of A; otherwise we subtract 10 from A and print new A: | ||
| ||
| ||
| In order to accomplish this, we have two IF conditions, on LINES 30 and 40, checking for (supposedly) mutually exclusive opposite conditions: when A is less than 10 and when A is greater or equal to 10. However, there's a flaw in our logic: value of A may get changed on LINE 30 if user entered A smaller than 10. And by line 40 it may become greater than 10. On line 40 we therefore will subtract 10 from A. This is not what our intention was!
One (simple) way to fix this bug is to append a GOTO command at the end of line 30, which will instruct BASIC to go past line 40, as in this example: | ||
| ||
| We also can fix this issue by introducing a temporary variable (called T in our example below) on line 25, which is then used in both IF commands on line 30 and 40: | ||
| ||
| To finish this section on IF-THEN-ELSE construct it's worth pointing out to another AppleSoft BASIC construct: "ON..GOTO", which directs program to different line numbers depending on the value (1,2,3..) of the evaluated variable: | ||
| ||
| In our example above we ask the user to enter value for A. On LINE 40 we use ON..GOTO construct to direct the program to line 100,200 or 300 depending on value of A.
It's worth noting that A in this case must be 1,2 or 3 (since we list only 3 options after GOTO command). If A is not equal to one of these values, we will get an error. To avoid
this error, I explicitly check for allowed values of A on LINE 30.
ON..GOTO contruct can be useful when we want to branch our program execution into several sections, depending on a condition, for which we can easily set a numeric variable ranging from 1 to N, when N is the number of branches. | ||
 | ||
| Creating Loops | ||
| In the program calculating the GCD shown above we saw that the same sequence of commands is performed several times. On LINE 40 we printed
values of A and B, then on LINES 50 and 60 we changed values of variables A and B; then on line 70 we instructed BASIC to go back to LINE
40 again and repeat the same commands, this time using new values of A and B. The process of repeating the same action again and again
is called a loop (or, more formally, an iteration); loops are very common in programming, in fact this is one reason why computers are so helpful: they can
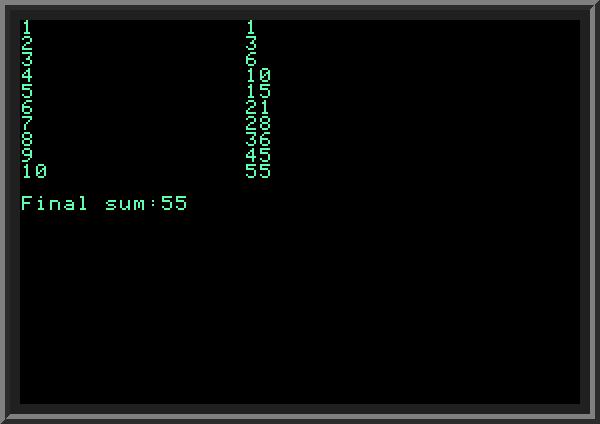
loop through a lot of information quickly, much faster than a human can. Applesoft BASIC has two ways of creating a loop: the first method uses GOTO command (as we did in our example); the second way is with FOR..TO command. When using a loop, we must make sure that at some point we exit (stop) the loop. In the above program on LINE 70 we check for a condition B > 0 to determine when to exit the loop. The loop continues only when B is greater than zero. If we don't include a conditional statement ending the loop when using GOTO loop, the loop will never finish, and the program will be running forever. This is not something we want in this example. Here is another example of using a loop with GOTO. The program calculates a sum of all integers from 1 to 10, and prints the result on each step: | ||
| ||
| ||
| Another way to create loop in Applesoft BASIC is using FOR..TO command. Let's look at the program which does the same (computes the sum of integers) using FOR..TO loop: | ||
| ||
| Notice the changes: on line 30 we put the FOR command, which sets the initial value of N and also sets the final value of N. The final value is the last value that N is allowed to have. Lines 60 and 70 also changed and now replaced with a single command "NEXT N" on LINE 70. Every FOR command must have a corresponding NEXT command. Any lines that are between FOR and NEXT will be executed in a loop. NEXT also can have an optional variable name (in our case it is N), telling the program which variable to increment. If included, this variable must match the name of the variable we specified in FOR.. command for this loop.
FOR command can also include an optional STEP parameter, setting the increment value which is added to FOR variable every time we call NEXT. If we don't include STEP parameter, it is set to 1. The following example shows the use of STEP parameter on LINE 30. Check out the different output we get: | ||
| ||
| ||
| We get the different result because this time we are adding only odd numbers: 1,3,5,7 and 9. Notice that even though the final value is set to 10, this value is not added; the NEXT command on LINE 70 increments N by 2 each time; when N is 9 and reaches the NEXT, it becomes equal to 11, and then this new value is compared to 10. Because N is now greater than 10, and STEP was positive, we finish the loop, and program goes to the command following NEXT, to LINE 80. STEP parameter can also be negative, as in the following example: | ||
| ||
| ||
| Let's now make the final value in FOR loop and the STEP parameter use variables. We will set them initially to 10 and 1. In the loop we will increment values of both variables and check the result: | ||
| ||
| Even though variables F and D get changed inside the loop, it has no effect on the loop itself: the step remains equal to 1, and the loop ends when N reaches 10. | ||
| ||
| As we see, even though variables F and D get changed in LINE 60, the FOR loop still uses their values set at the start of the loop.
It is worth noting that FOR loop checks for the completion only when we call NEXT. Look at the following piece of code: even though N is initially set to 1 and LOOP must finish when it reaches zero, it executes one time, until it reaches NEXT command. It means that commands within the FOR loop, unless we specifically include a condition to exit the loop, will be performed at least once, regardless of the initial and final values used for the FOR variable. This is different compared to other languages (such as C): | ||
| ||
| ||
| All the parameters in the FOR loop must be numbers, but they don't have to be whole integers. In the following example we add numbers starting from 0.5 to 10.1 with step 0.75. The last number which gets added is 9.5 (why?): | ||
| ||
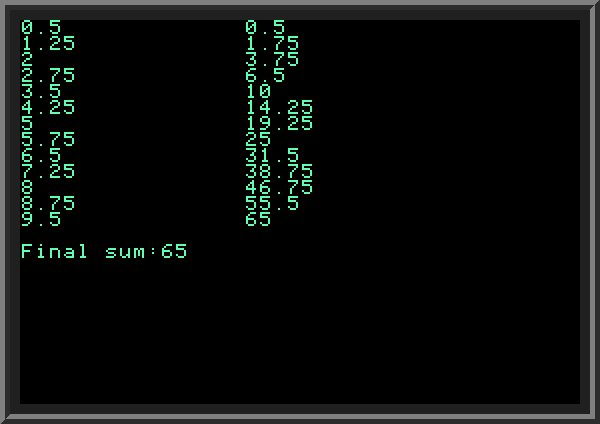
| ||
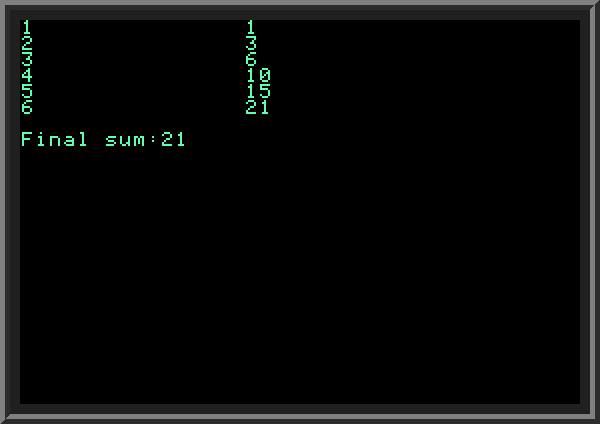
| We can exit the FOR loop if necessary even before the loop variable reaches its final value by calling GOTO and redirecting the program somewhere outside the loop. In the example below we add values but make sure that resulting sum does not exceed 25: | ||
| ||
| ||
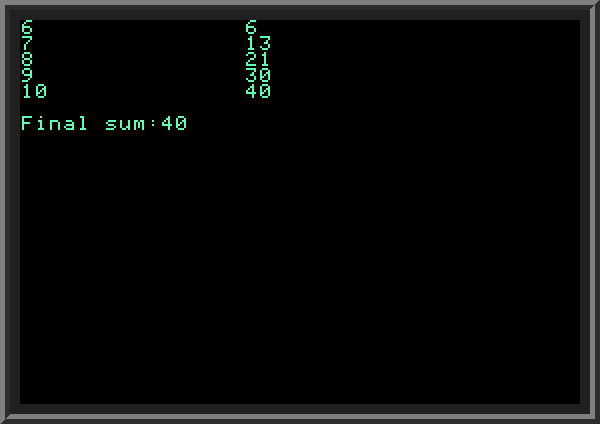
| If you want to skip a part of the loop without exiting the loop itself, use GOTO with the line number containing NEXT. In the following example we add only values of N greater than 5. Notice LINE 35 with GOTO 70 command which tells the program to skip the rest of the current cycle. | ||
| ||
| ||
| One interesting use of FOR loops in BASIC is to create a delay. The following program prints 10 rows of numbers, row by row, with about one-second delay. The empty FOR loop at LINE 60 increments variable B from 1 to 5000, forcing the rest of the program to wait. If you want to increase or decrease the duration of the delay, set a different upper value for B: | ||
| ||
| To finish this rather tedious section on FOR..TO loops, I want to point out to one common mistake beginner BASIC programmers make: when skipping to the next loop instead of calling GOTO (LINE with NEXT) they call GOTO (line with FOR), like this:
This example intentionally contains an error on LINE 35. | ||
| ||
| In this example the NEXT command on LINE 70 never gets called, and FOR loop never finishes.
When should the FOR loops be preferred to the GOTO loops? When your loop contains a variable, which gets incremented by a constant value (either positive or negative) in every cycle of the loop, FOR loops are preferred. They do the initial assignment, incrementing and the finishing condition check for you automatically. If you know the number of cycles ahead of time, you can use a counter as FOR loop variable and increment it by 1 in every cycle. And if you need to exit the FOR loop early, it is easy to do with a conditional GOTO command placed inside the FOR loop. In other cases, you can use a loop created with GOTO commands. In this tutorial FOR or GOTO loops can be found in almost every example below, so you will have plenty of chances to learn them. Note: Other programming languages (and even other versions of BASIC) have more ways to create a loop, for example with WHILE or DO..WHILE commands, where loop can be exited when a logical condition is met. | ||
| Variables: numeric vs. string; 2-character name limit; case-insensitive. | ||
|
||
| ||
| Assigning RADIANS value of 1 sets also RADIUS to 1 because these variables share the first two letters in the name. | ||
| Two text modes. TRACE and NOTRACE | ||
| Applesoft BASIC has support for two TEXT modes: 40 by 24 and 80 by 24 characters. To switch between them
use PR#0 and PR#3 commands. Why do we need two different text modes? Sometimes we want to be able to fit more information in one screen.
Most examples in this tutorial don't depend specifically on which text mode they run in; however in cases where it matters you should not forget to set the proper mode.
To switch to text mode from graphics mode, use TEXT command. To clear the screen completely in TEXT mode, use HOME command. These commands are often combined in one line, separated by colon. The coordinates begin at the TOP LEFT corner of the screen, where cursor position is (1,1). Coordinates increase as we move right and down, the bottom right corner having position (24,40) in 40-characters-per-line mode and (24,80) in 80-characters-per-line mode. | ||
 | ||
|
Text modes don't support colors; they are black and white (in our case black and green), however you can swap these colors to print black text on green background with INVERSE command. To return to normal mode, use NORMAL command.
TRACE and NOTRACE commands are useful for debugging (the process of finding errors in your program and more specifically, when you don't see the result you expected and have no idea why). TRACE enables printing the line numbers which are being executed; NOTRACE turns off the TRACE mode. The following snippet demonstrates switching between two TEXT modes and the use of TRACE command: | ||
|
| ||
| 40x24 and 80x24 TEXT modes and TRACE in action: | ||
| ||
| A common question asked about the TEXT mode is whether it is possible to place text at a specific position on screen rather than in the top left corner. For this purpose Applesoft BASIC has two commands, VTAB (row) and HTAB (column), which take a row and column to move the cursor to. So in order to print something starting on third line from top of the screen, at the leftmost position, you set cursor position with "VTAB 3 : HTAB 1". The following program takes input string from user and outputs the same string in the center of the screen. If string is less than 30 character long, it uses 40x24 mode, otherwise it switches to 80x24 mode. | ||
|
| ||

|
||
| Keep in mind that valid values for VTAB are 1..24, for HTAB 1..40/80. If you specify an invalid position with HTAB or VTAB, you will get an error. | ||
| Enter the fun: graphics modes | ||
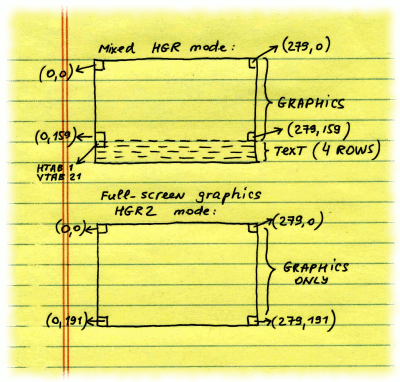
| Applesoft BASIC includes 2 graphics modes, for low-resolution graphics (LO-RES) and high-resolution graphics (HI-RES). Each of them has two sub-modes: for full-screen graphics and partial screen graphics (also called "mixed" mode, where upper part of the screen contains graphics, and lower part of the screen can contain text, which can be outputted with PRINT command, for example; essentially in the mixed mode the bottom part of the screen works in TEXT mode).
Here are some important things to remember about Applesoft BASIC graphics:
| ||
Hi-res mixed HGR and full-screen HGR2 modes:
| ||
| One hi-res graphics example | ||
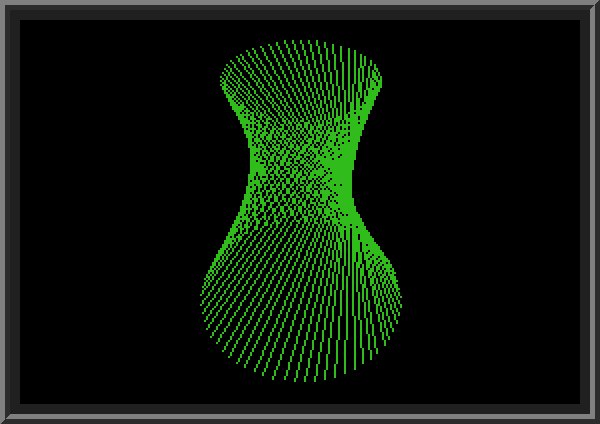
| The following tiny program draws a hyperboloid, a complex 3-dimensional geometric shape, using only straight lines: | ||
|
| ||
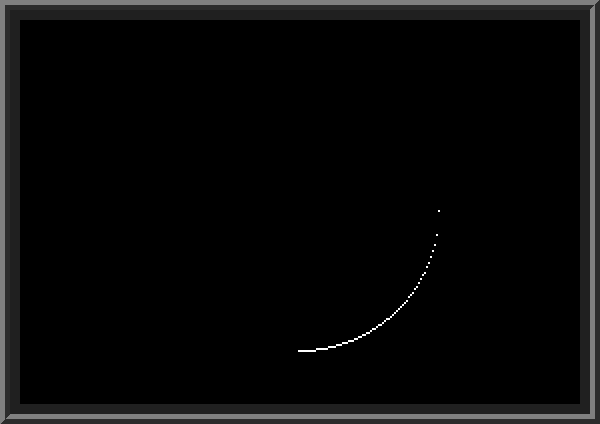
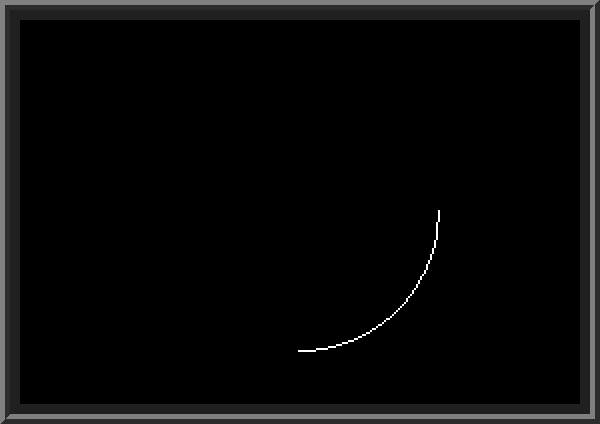
| Don't try to parse everything in this program unless you are familiar with trigonometric functions COS and SIN, which are used in this program. We will get down to the details of this program later. For now, let's look at how the graphics mode is set up: On LINE 10 we call HOME (which is not really necessary in this case), to clear the screen in case it was in TEXT mode. Then we call HGR2 to initialize Hi-res full-screen mode with 280 x 192 resolution. HGR2 also clears the screen with black. Then we set the current color to 1 (green) with HCOLOR command. This is the color which is used to draw pixels and lines with PLOT and HPLOT commands. Unless we explicitly set the current color, it will be black and we would not be able to see anything we draw on a black background. After this (LINES 30-90) using FOR..TO loop we already are familiar with, we draw a series of straight lines (LINE 80, calling HPLOT). Below is the result: | ||
|
||
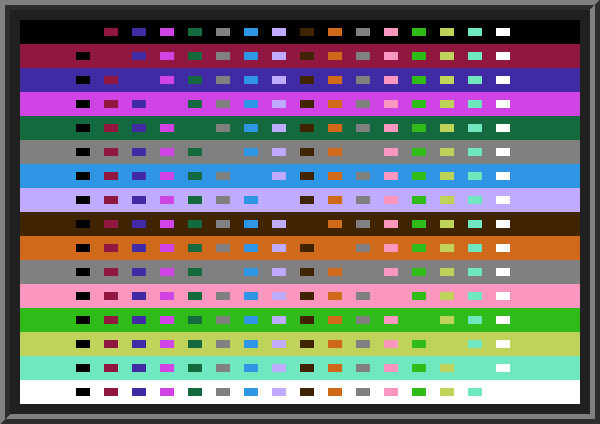
| Low-res mode colors and pixels | ||
| Low-resolution mode has resolution of 40 by 48 pixels (in full-screen sub-mode) and supports 16 colors. Let's check how these colors and pixels actually look: | ||
|
| ||
|
||
Let's look at this program line by line.
We will look at colors of the hi-res mode later in this tutorial. What we already can conclude, however, is that for any graphical images requiring a level of detail we need to use BASIC's hi-res mode. The low-res mode has two advantages: twice as many colors, and ability to fill rectangular areas on screen quickly with a solid color. But the low-res graphics are not as refined, plus it lacks the function to draw a line between two arbitrary points. The HLIN and VLIN calls of the low-res mode are only for drawing horizontal and vertical lines. | ||
| Binary numbers | ||
| If you are serious about learning programming, you know that computers save all information as ones and zeros.
Individual ones and zeros are called bits, and bits are grouped in bytes, 8 bits per byte. So how computer stores
number 45, for example? To store a number, it converts it into special format having only 1s and 0s. This format is called binary, and numbers written in this format are called binary numbers. Decimal number 5 is written as 101 in binary format.
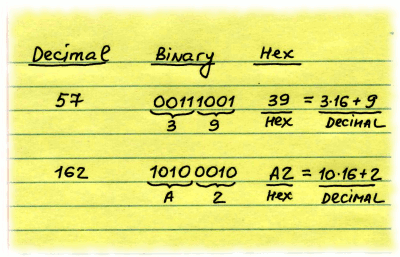
The system most of us familiar with for writing numbers is called decimal. This is because its base is ten: we use ten different symbols (digits from 0 to 9) to write the value of a number. When we want to write a value greater than 9, we use a sequence if decimal digits, for example 57 means a number equal to "five, multiplied by ten, plus seven". The binary system uses 2 as the base. It means that any natural number or zero in it can only use combination of 0s and 1s. | ||
 | ||
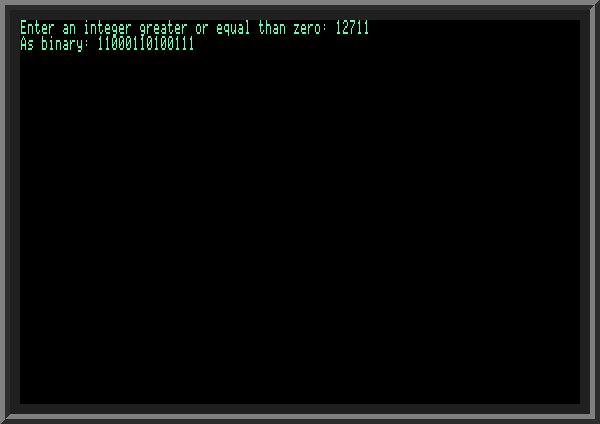
| In this lesson we look at BASIC program which converts any natural number we enter in decimal form into binary format. Then we will write a program which converts a binary to decimal. This way you will learn more about
binary numbers and about BASIC.
The method to convert a number A into binary format looks as follows:
This is how it looks in BASIC: | ||
|
| ||
| ||
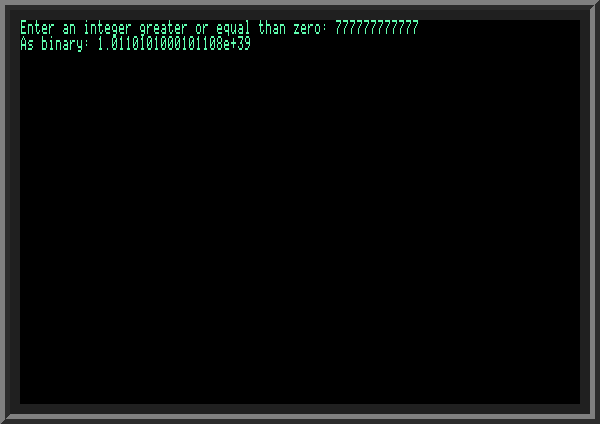
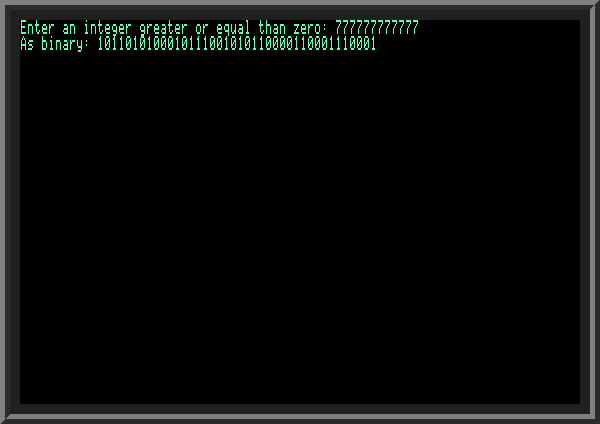
| In this implementation I am playing a trick: even though X denotes a binary number, I internally store it as decimal. For input A=5, X becomes 101 (one hundred and one, calculated as 1 + 0 * 10 + 1 * 100). Variable P holds a multiplier which is used to multiply B, the current bit. The product of this multiplication is then added to X. P is initially set to 1, but with each next bit it grows by 10 times: 10, 100, 1000 and so on. This approach makes it easy to output the final X: we simply call PRINT X.
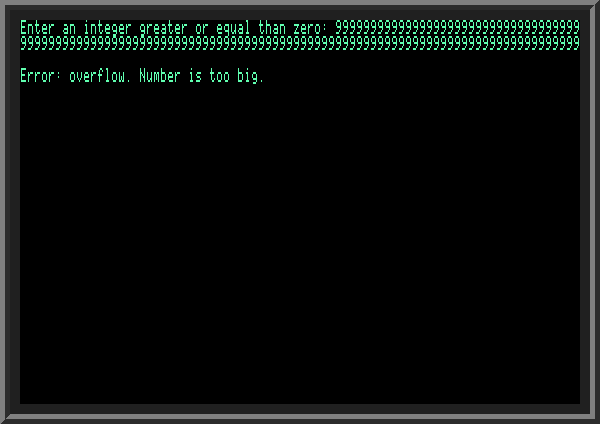
At the same time, it has its drawbacks: when A is large enough, X quickly runs out of valid bits to hold a gigantic decimal value: | ||
| ||
| In order to fix this issue, let's instead use a string variable, which will hold the string representation of the binary. This way the program is much smaller and also easier to understand: | ||
|
| ||
| ||
| Now let's look at the program which does the opposite: it takes a binary number (as string containing only ones and zeros) and converts it to a decimal number. The program looks as follows: | ||
|
| ||
| In this implementation, we determine the length of the entered string (LINE 120). Then we walk through every symbol of the entered string from RIGHT to LEFT. Variable B$ (see LINE 140) is set to I-th character of the input string M$ counting from the right, representing I-th smallest bit of the entered binary number.
If B$ is not equal to "0" or "1", the user entered a string containing symbols other than ones and zeros: we print error message on LINE 300 and then go back to LINE 100, asking user to re-enter the number. Otherwise, we assign numeric value of B$ to variable K (LINE 160). Line 170 increments variable S (this is where our final decimal value is stored) - by adding K multiplied by 2^P (where P is current bit position from right, starting from 0; it means that P = I-1). When FOR..TO loop finishes on LINE 200, S contains the final value we need to print (LINE 310); after this program finishes. Important Note: Look at LINE 100. We assign variables P and S to zero. Is this really necessary? BASIC assigns all numeric variables to zero by default anyway, so why this line is needed? It is needed in case user entered a string containing characters other than 0 or 1 somewhere in the middle, for example "1001ABC001" and program discovers this on line 150, when variables S and P already have some values different from zero. We then show an error on line 300 and want to ask the user for new input string N$. But before this is done, we need to reset values of P and S to zero. We also can use CLEAR command for this, which is a better way to reset all variables to their default values! Here's the sample output of converting a binary to decimal: | ||

| ||
| This is not the only way to convert binary to decimal: we can do this by walking the entered string from LEFT to RIGHT. The following program demonstrates this: | ||
|
| ||
| Notice the change on line 140: variable B$ contains I-th symbol from the left (as opposed to I-th symbol from the right in the previous example). In this implementation for each bit K, starting from the left, we multiply variable S by 2 and add K (see LINE 180). The rest of the program is very similar to one in the previous example. This version is less intuitive, but faster: we don't call 2^P in every loop cycle. | ||
| Catching Errors with ONERR | ||
| Recall an earlier example where we were converting a decimal number to binary form, but were using a number to hold the value?
We did see that when we entered sufficiently large number, the output was not quite what was expected. Worse that this, if we try entering even larger number as input (by filling 2 lines with 9, for example), we get an overflow error.
Overflow error means that computer cannot store the number we are asking it to store because it's too big.
BASIC has a special command, called ONERR, designed to catch errors instead of showing them to the user, and stopping the program. ONERR takes a line number which we direct the program to in case of error. Additionally, PEEK(222) gets the code of the latest error (code for overflow is 69). This way we can handle multiple errors in a more graceful way: | ||
|
| ||
| ||
Some Applesoft BASIC error codes:
| ||
| ONERR call can be canceled by calling POKE 216,0. When you leave a section where you handle a particular possible error (such as overflow) with ONERR, it's a good idea to call POKE 216,0 to disable previous ONERR or call ONERR again with different target line to handle. | ||
| More graphics: drawing a circle | ||
|
Armed with what we already know about hi-res graphics and handling errors with ONERR, let's try something that's not supplied with
BASIC as standard call: drawing a circle. There are different ways to draw a circle.
We start with a simple method, then move to more advanced ways to do this.
To make things simpler, we will draw a circle centered at coordinates (X=0, Y=0). Such circle with radius R conforms to the equation X^2 + Y^2 = R^2 (this is basic algebraic equation of a circle with center at X=0 and Y=0). Solving this equation, we get Y = SQR (R^2 - X^2), where SQR is square root function included with BASIC. We will try drawing first only part of the circle where X > 0 and Y > 0 (the first quarter). In our program, we will draw circle point by point, using HPLOT X,Y in a loop where X changes from 0 to R, and Y is calculated using the formula shown above: | ||
|
| ||
 | ||
| This method of drawing circle works fine when X is small, but as it gets closer to R, the line appears broken. We can fix this by using HPLOT TO call which draws a line from the latest point to a new coordinate: | ||
|
| ||
 | ||
| The circle is symmetrical, so in order to draw the full circle we can repeat the process for all four quarters, only changing the sign of X and Y components accordingly: | ||
|
| ||
 | ||
| We have a complete circle. However, we are doing a lot of repeating calculations. The circle centered at X=0 and Y=0 is symmetrical not only for all four quarters, but also for all pairs of its X and Y coordinates. If point P with given X and Y is part of the circle, point P2 with coordinates (Y, X) is also part of the circle. So even to draw the first quarter, we can draw points (X,Y) and (Y,X), and have our FOR loop only go until X < Y. We know that when X is small, we don't need to use the HPLOT TO call to draw the line between subsequent points: our points are close enough on screen and we can use only point-drawing HPLOT. Because of this, we can speed up the process even more by plotting all eight points given a single pair of X and Y: | ||
|
| ||
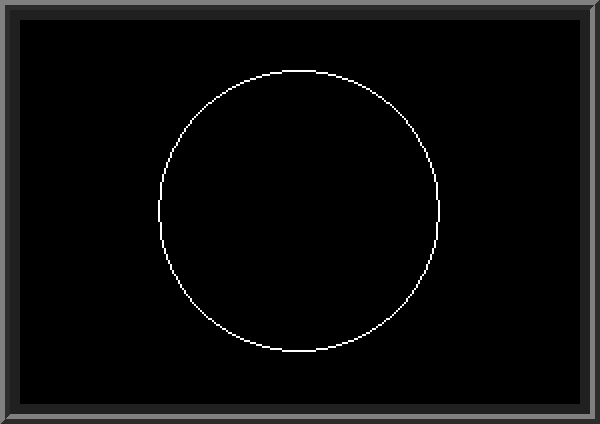
| We made a few changes in our code. First, we ask the user to enter desired radius, between 1 and 96. Our screen is only 192 pixels high, so it will not fit in a circle with radius greater than 96 (192/2 = 96). Second, we added a special value R2, which will hold the square of R, so that we don't calculate this value over and over as part of calculating Y on LINE 70. On LINE 75 we compare the current values of X and Y, and exit the loop once X becomes greater than Y (to avoid any rounding issues we actually exit the loop only when X > Y+1). Lines 80..88 plot eight points using only one given pair of (X,Y) from the first octave (first 1/8-th of the whole circle). This program is about six times faster than our previous version.
Below is a circle with radius of 96 created by our latest program: | ||
 | ||
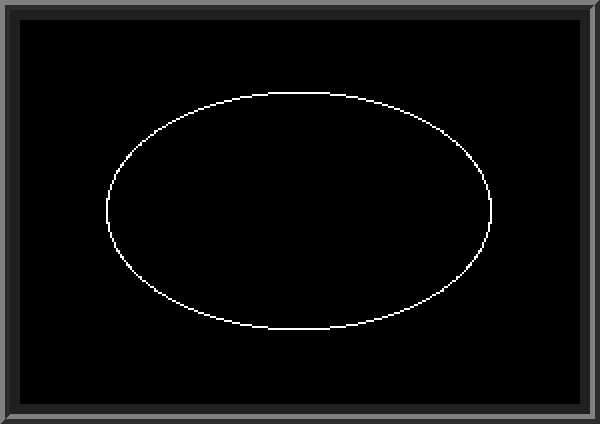
| This method can be easily applied to draw an ellipse. All we need to do is multiply one of the coordinates (with a smaller span) by a coefficient K (where K must be between -1 and 1, to keep the ellipse line solid). The following example shows an ellipse with vertical axis being semi-major (smaller) and horizontal axis being the major axis: | ||
|
| ||
 | ||
| Using trigonometric functions to draw a circle | ||
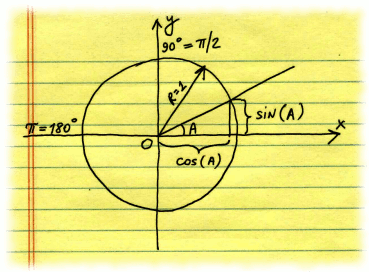
| In this approach, rather than looping through individual values for X and finding corresponding values of Y coordinate using SQR function, we will use trigonometric functions of sine and cosine (SIN and COS in BASIC) to get values X and Y. For circle with radius R = 1.0 functions COS and SIN return values of coordinates X and Y of all points that lie on the circle, given the value of an angle between axis OX (horizontal line which passes though point X=0, Y=0) and line that passes through points (0,0) and given (X,Y). So the variable we will be looping though is not X, but angle (we will call it A). | ||
| ||
| To draw the full circle, A will change from 0 to 360 degrees. COS and SIN functions take angle parameter in radians, not in degrees. 180 degrees in radians correspond to PI (about 3.14159), and 360 degrees correspond to value of 2*PI. For circle with radius R, in order to get values X and Y, we have to multiply the values returned by COS and SIN by R: | ||
|
| ||
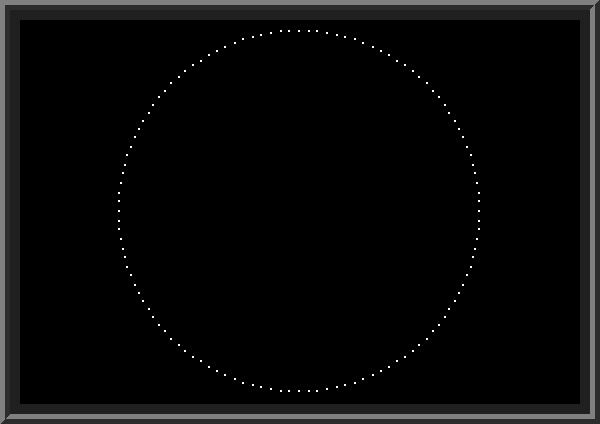 | ||
| The above program plots 120 points along the circle. This is controlled by STEP parameter on LINE 80. It is set to PI/60 so the total number of steps will be 120. To make it look as a solid circle, we can use HPLOT TO call to connect all subsequent points. The important decision about how many points to use with this method depends on the size of the circle itself. The length of circumference is 2*PI*R, so to make the circle look smooth we adjust the number of points proportionally. The following program demonstrates this logic, by drawing a number of concentric circles with radiuses ranging from 3 to 96, each having different number of points: | ||
|
| ||
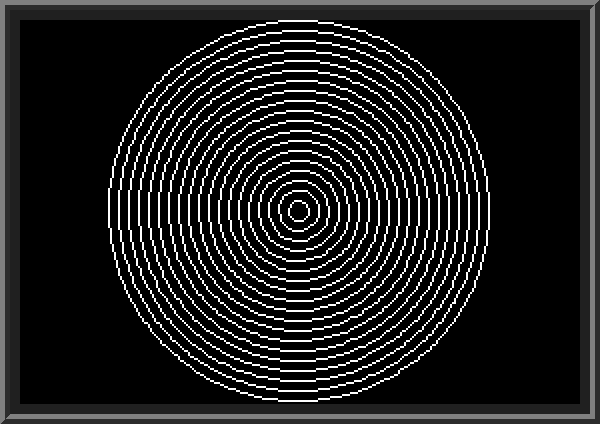 | ||
| So, which of the two methods we presented should be preferred when drawing a circle? The method using trigonometric functions looks much simpler. It also allows more control over granularity of the circle: we can control how many points along the 360 degrees we want to use. When circle radius is only a few pixels in size, we don't need to plot hundreds of pixels to draw the circle: it would be on overkill; at the same time when circle radius gets bigger, circle's curvature decreases and we can allow more space between individual points without losing much quality. Which in turn means less points to calculate and draw, so it can be done comparatively quicker. | ||
| Midpoint circle algorithm (advanced) | ||
| To finish the subject on drawing circles, we need to look at another algorithm, which is actually used in many modern-day programs to draw a circle or part of a circle very quickly. The algorithm derives from the circle equation, but is written to avoid calling slow functions such as square root. It is called the Midpoint circle algorithm. Just like the method using SQR, which we analyzed above, it draws the circle in octants (we calculate a pair of X and Y, and then draw eight points along the circle); the trick is to know when to move to the next Y coordinate as we move along another coordinate, X, without calling SQR or trigonometric functions. Below is its implementation in BASIC: | ||
|
| ||
| More examples with trigonometric functions | ||
|
Trigonometric functions can also be used to draw ellipses; the idea is similar to drawing ellipses using SQR function as we did before: all that we need is to multiply one of the coordinates (the one with smaller axis) by a coefficient K between -1 and 1. This method was in fact used to calculate where to draw the lines in the hyperboloid picture presented earlier. They start and end along points that belong to two ellipses.
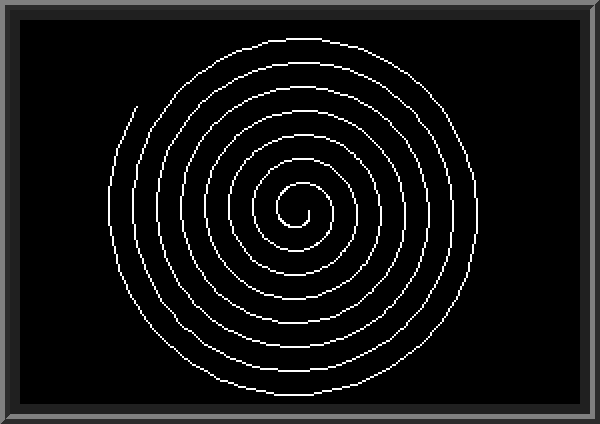
To give you another example of drawing graphics primitives with COS and SIN, I will show a small program which draws a spiral. This is actually the case where other methods (we used for drawing a circle) don't work. Spiral is drawn similar to a circle, except the distance to its center increases proportionally to the angle we use in COS and SIN. In this example, I use GOTO instead of FOR loop, to check when R becomes greater than 96 (LINE 130). I increase R by 0.1 on each step, and angle A by PI/60. | ||
|
| ||
|
||
| Suggested Exercise: In the program drawing a spiral, replace GOTO on line 130 with FOR..NEXT loop using R as loop variable. What happens when you increase the step for R from 0.1 to 0.2? | ||
| String and type conversion functions. Calling subroutines with GOSUB. | ||
AppleSoft BASIC has several built-in functions for working with strings. We already used a few of them: LEN, VAL, STR$, ASC. Here are the string functions and type conversion functions which convert string to numbers and vice versa:
| ||
|
| ||
|
||
|
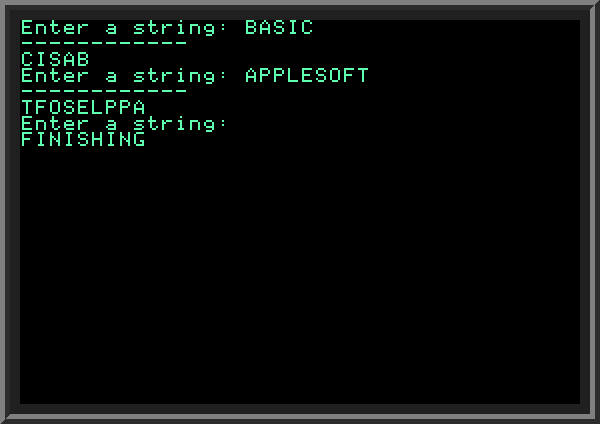
Let's take a closer look at this program. In all examples until now, all our programs consisted of a single code block where the last line was calling END. In this last program, we split the program into several blocks: LINES 10..100 are the main program, LINES 300..350 is another block called a subroutine, and LINES 400..450 is another subroutine.
Subroutines are called from the main program block (the can also be called from subroutines) using GOSUB command, which takes their first line number. In our case on line 40 we call a subroutine with GOSUB 400 command. This tells the program to go to a subroutine starting on line 400. All subroutines must end with keyword RETURN. The two subroutines in our case call RETURN on LINES 350 and 450 correspondingly. A subroutine can have several RETURN calls, in case we want to end it earlier. You may wonder: why not just use GOTO command instead of GOSUB? The advantage of GOSUB is that it automatically remembers the place where it was called, so when returning from a subroutine (when RETURN is called) the program continues from the command following the calling GOSUB. When we use GOTO, on the other hand, the program does not remember where it was redirected to a new line by GOTO. The same subroutine can be called in many places, so we can separate a piece of program logic we use frequently in a subroutine, and call it anywhere in the program we want. Subroutines also make the program more structured by logically separating its parts. Many BASIC programs use subroutines, and we will use them in many examples below in this tutorial. Why include two subroutines on lines 300 and 400 in our example? The two subroutines in our program do exactly the same thing: they take input string S$ and reverse it, placing the result into string R$. But they do this a little differently. The subroutine starting at LINE 300 loops through all characters in S$ one by one, from right to left, using built-in MID$ function we described earlier, on LINE 330. It appends (adds) the given character to string R$. The subroutine which starts on LINE 400 does the same thing by using combination of LEFT$ and RIGHT$ functions. The RIGHT$ function gets the last I characters of input string S$, then LEFT$ function takes only one first character of this substring (LINE 430). The result is appended to R$. As we can see, we can replace MID$ function with combination of calls to LEFT$ and RIGHT$ functions. As you can see, in our example the subroutine starting on LINE 300 is never called. You can change GOSUB call on LINE 40 to call the subroutine an 300 instead: the program result will be the same. In your programs, sometimes you want to include several subroutines which accomplish the same thing differently, to test which one works better (faster, uses less memory, etc.), before deciding on which one is the best. | ||
| Another computer number format: hexadecimal numbers | ||
| Earlier in this tutorial we looked at binary numbers. They are helpful for understanding how computers store and communicate information, but typically are not used explicitly in computer programs (because writing numbers in binary format is not very convenient). Instead, another, more compact format, called hexadecimal (or Hex, for short), directly related to binary format, is often used when we want to work with individual bits. | ||
 | ||
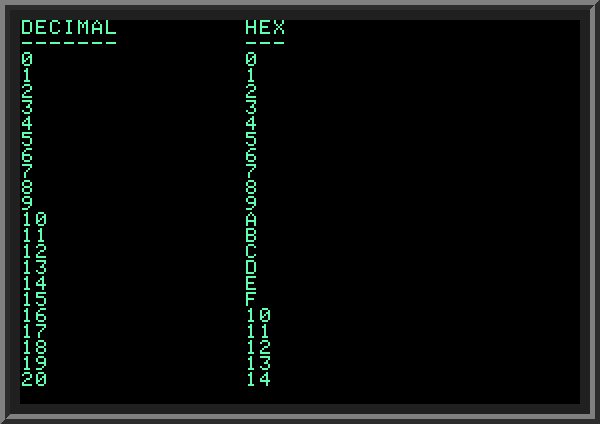
| The base of this format is 16, which corresponds to 4 binary bits. It means that every byte (or 8 bits) can be written as 2-symbol hexadecimal number. The hex format uses 16 symbols to represent 16 different values the 4 bits can represent: numbers 0-9 to represent values from zero to nine, letters A,B,C,D,E,F to represent values from ten to fifteen. The following program prints numbers 0 to 20 in decimal and hexadecimal format: | ||
|
| ||
|
||
The procedure of converting a decimal number to hex format is moved to a subroutine starting at LINE 200.
The conversion algorithm is similar to the one we used for binary numbers, except instead of base 2 we use base 16:
| ||
| Displaying large documents using paging | ||
| Sometimes we want to display text information which does not fit in one screen. A table with 100 rows, for example, will not fit in screen with 24 rows.
In this case we can split it into several "pages", letting the user to move between pages by pressing a key (often different keys are utilized to move up or down the document).
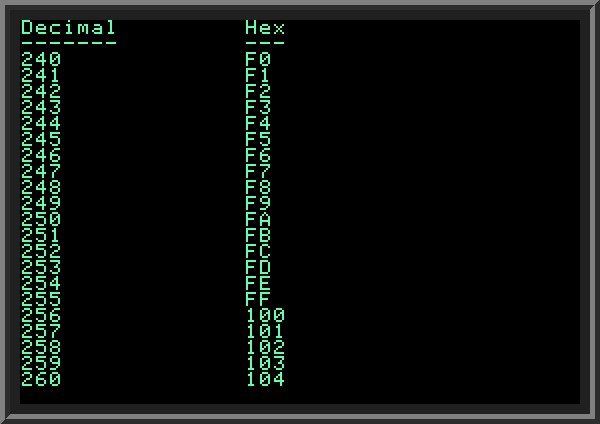
The following program uses "paging": it prints every next 20 numbers in decimal and hex format, refreshing the screen with new set of numbers when user presses a key. It is using a subroutine beginning at LINE 200 to do the decimal to hex conversion. This subroutine is similar to the one we used in the last example, except we compacted LINES 230..280 from the previous example into a single LINE 230 by utilizing CHR$ function. | ||
|
| ||
|
||
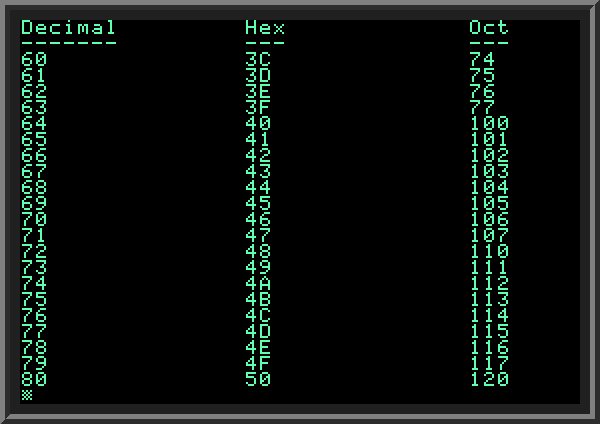
| Suggested exercise: another number format used in computers, called Octal, has base of 8. The symbols used in this format are digits zero to seven. Modify the paging program shown above to add a new subroutine, which converts decimal numbers to octal format, and print a third column showing octal numbers, as shown in the picture below: | ||
|
||
|
Converting numbers from one base format to another is a good way to practice your programming skills in BASIC. This is why I encourage you to do more: Suggested exercises:
| ||
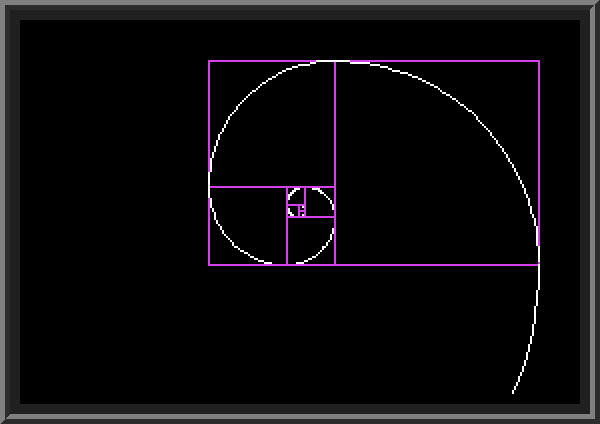
| Drawing Fibonacci spiral with arcs (advanced). | ||
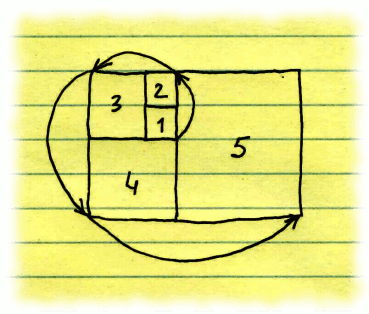
| The Fibonacci numbers we looked at earlier can be also represented visually in a two-dimensional space, by drawing adjacent squares with sides equal to the subsequent Fibonacci numbers: 1,1,2,3,5,8 and so on. The method is the following: | ||
 | ||
|
We draw the first square with side equal to 1. Then just above it we draw another square with side of 1; the two squares must border each other. Then we move left and draw a third square with side of 2, which borders the two squares with already have. Then we move down and draw another square with side 3, having a common border with squares #1 and #3. We continue moving in the counterclockwise direction (UP, LEFT, DOWN, RIGHT)
each time drawing another square with side equal to the next Fibonacci number.
Fibonacci spiral is a line consisting of a sequence of arcs (each being one quarter of a circle) drawn within each of the Fibonacci squares. The radius of each arc equals to the side of the corresponding square. The following BASIC program implements the logic. As user presses a key, it draws a new square and next part of the Fibonacci spiral. | ||
|
| ||
| Fibonacci spiral: | ||
|
||
| In this program variable D controls direction we want to move on a given step (UP, LEFT, DOWN, RIGHT).
Note: The screen Y coordinate grows from TOP to BOTTOM of the screen (opposite to what we are used to when doing things on paper), so the program actually draws everything clock-wise (DOWN, LEFT, UP, RIGHT). Variable M (set on LINE 70) controls the scale in which everything is drawn. We use subroutines to draw Fibonacci squares (LINE 400) and each part of the Fibonacci spiral (LINE 600). We draw squares in purple and spiral in white. The GET commands on LINE 130 and LINE 160 waits for user to press the next key, after which the next part of the image is drawn. As spiral grows, eventually we will go outside of the allowed screen coordinates. I use ONERR to figure out when this happens (see LINE 400 and LINE 610): variable E gets set to 1 when we try to draw outside of the screen (LINES 470 and 710). E gets checked on lines 130 and 150 - in case it is set to 1, we clear the screen and all variables (LINE 10) and start the program all over. To draw a part of the Fibonacci spiral in the subroutine beginning on LINE 600, we draw an arc quarter size of the circle (LINES 660..680); I use trigonometric functions to draw the arc, but have to pay attention to the angle: the range is different each time and depends on direction. | ||
| Arrays: a way to store multiple values | ||
|
Until now we used variables to store individual values. What if we need to store a number of values, for example, we want to store 12 values, each containing a number of days in a given month of the year (let's leave issue of number of days in February aside for now)? Do we need to declare 12 individual variables? What if we want to store a 100 values? It would be very inconvenient to individually declare 100 variables and coming up with unique name for each. Fortunately, there's a better way: arrays. Arrays are specifically designed to be declared once and be able to store a number of values, which are referenced by array INDEX. Arrays are declared by keyword DIM, followed by a unique array name (similar to variable names, only the first 2 symbols of the name are important in AppleSoft BASIC) and the array size (in parenthesis), specifying how many elements it should hold. Size must be integer value greater than zero. It can be specified as integer constant or as numeric variable holding integer value. We reference individual elements of the array by index. In BASIC array index starts with 1. Here's the example: |
||
|
||
| In this example, we declare array A which can hold up to 5 numbers. We then ask the user to enter 5 numbers and put them into array elements, one by one. Starting from line 90, we add all five values from the array to a string variable S$, separating them by commas (note that comma is not added until there's at least one value in S$). Finally, we print variable S$.
Staring from line 200, I test what happens if I access array by an invalid index (such as 0, -1 or 6). I catch errors using ONERR on line 270. Interestingly, index 0 does not show an error, and values -1 and 6 (both invalid in our case) result in different errors. Try it yourself by commenting out line 240. Arrays also can hold strings. Similar to string variables, to declare a string array we end its name with dollar symbol. The following snippet asks the user to enter 5 strings, stores them in a string array and outputs all of them in a single line separated by commas. | ||
|
||
| BASIC arrays can be also multi-dimensional (have more than one INDEX), for example to store ten points each holding 2 coordinates (X and Y) we can declare an array as DIM PT(10,2) and reference i-th point X coordinate as PT(i,1) and Y as PT(i,2). In this tutorial we will be using arrays in many examples, but to keep things simple I use one-dimensional arrays in most cases. | ||
| Non-blocking keyboard input | ||
| Until now, we used INPUT and GET commands as a way to get the user input from keyboard. These functions are blocking: the program is suspended while waiting for user input until user presses Enter (or in case of GET command waits for a single key being pressed). What if we are programming a game where we want to allow user to press navigation keys (such as arrows) but at the same time don't want the program to stop waiting for the input? We can accomplish this by checking the keyboard status with PEEK(49152) which returns true only when keyboard was pressed. Then we call GET to retrieve the pressed symbol and use it: | ||
|
||
| Detecting which key was pressed: ASCII codes | ||
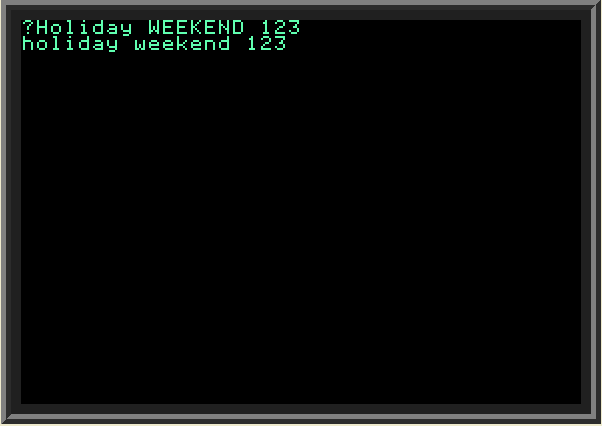
| Most keys we press on a keyboard have corresponding unique codes, known as ASCII codes. They include all English alphabet letters (both uppercase and lowercase), digits, punctuation characters and special keys such as Escape, Tab, Space, arrow keys and so on. The following snippet shows how to get ASCII codes of the keys we press on the keyboard using ASC function. For example, Left, Right, Up and Down arrow keys have codes 8, 21, 11 and 10 correspondingly. | ||
|
||
|
We can use ASCII codes not just to detect special navigation keys (such as arrows) but also for example, for converting strings to uppercase or lowercase. Checking the ASCII table we see that English uppercase alphabet characters have decimal codes 65 (A) to 90 (Z), and the lowercase characters have decimal codes 97 (a) to 122 (z). So, by adding 32 to the code of any uppercase English letter we get the ASCII code of the same lowercase letter. The following code demonstrates how to convert any English string to lowercase: | ||
|
||
| ||
| Suggested exercise: modify the above program to convert all symbols in the entered string from lowercase to uppercase letters. | ||
| Combining it all together: Snake game prototype | ||
|
Let's use ASCII codes and non-blocking keyboard input to create initial prototype of a well-known
Snake game.
This version will use TEXT 40-character mode and will draw a snake (of unlimited length) as user presses arrow keys.
In this case I am using a subroutine which starts at line 200. It detects which arrow key was pressed, adjusts the cursor position (X,Y), moves the cursor there and outputs letter "A". In order to avoid seeing errors, we need to make sure that cursor stays within the allowed range (1 <= X <= 40) and (1 <= Y <= 24). However, we still get undesired effect of screen scrolling down when snake moves to (40,24) - the bottom right corner of the screen. To avoid this, we limit X to the maximum value of 39 (not 40). |
||
|
||
Below is the result: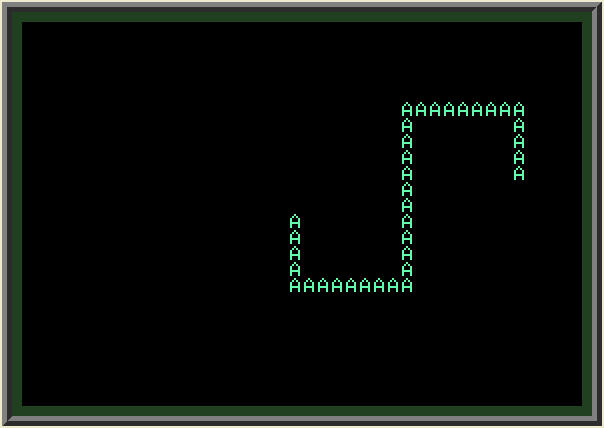
|
||
| It is fairly easy to adjust the program for the graphics mode: instead of drawing letters we draw square outlines (this is much faster than drawing the solid the rectangle of the same size). In my case I made each square 8x8 pixels in size, and change the color as I move the snake (something that was not possible in the text mode): | ||
|
||
|
Below is the result: Note that on lines 240 and 250 we compare X and Y against 0 (not against 1, which is the minimum allowed value in the TEXT mode version). 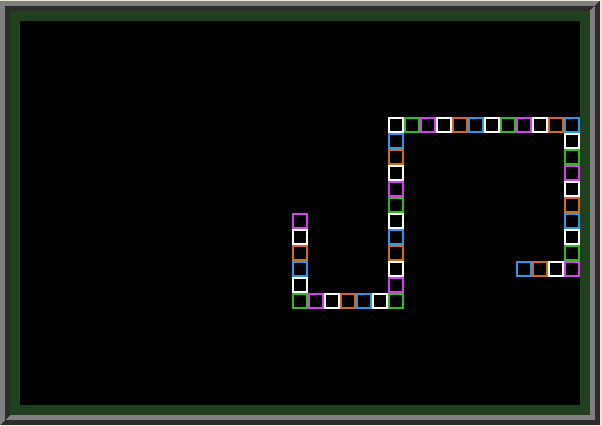
|
||
| The next step is to draw the snake of a given (limited) length of N. To accomplish this we use arrays: to store all positions (X,Y) snake moves to, and by removing the oldest position (the tail) as we move forward when total length exceeds N. I am using 2 arrays, XM and YM (both sized to keep up to N elements) to store all sequential snake positions, and a special variable C to keep track of the head position (this variable is initially set to 1) within these arrays. When C reaches N+1, we reset it back to 1, otherwise C is incremented by 1 as we move the snake. The tail position (also pointed by POS) is "erased" by printing space, and corresponding position in the XM and YM arrays is immediately filled with new position (of the current snake head). The technique is commonly known as queue or
FIFO (first in, first out). The modified version for Snake program in text mode now looks like this: |
||
|
||
Suggested exercises:
|
||
| Using array to order (sort) numeric data. | ||
| Often we need to order the data which is stored in the array. Think for example of your cell phone contacts: when you open the list of contacts they appear on screen ordered alphabetically, from A to Z. But most likely you have not entered them in this order on your phone! So the program displaying them somehow re-ordered them for you, so that you could find the contact quicker by looking it up alphabetically. This process is known as sorting, and it's very common in programming. In this lesson we will look how a simple sorting can be done in BASIC using arrays.
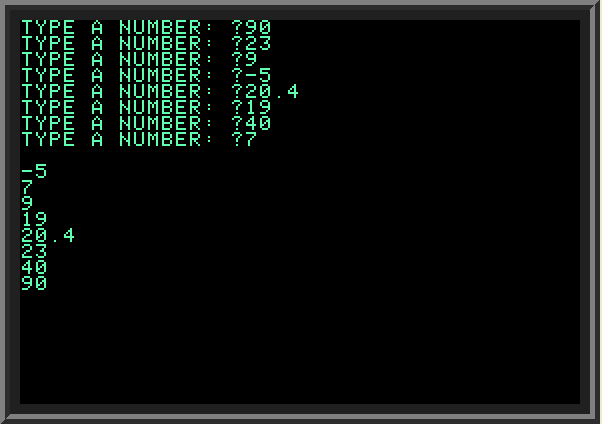
The method we will use is called Bubblesort algorithm. This is not the quickest way to sort an array but it is fairly simple and is good for our purposes. We sort an array by walking through its elements, starting from element with index I=1 and finishing with I=N-1 (where N is the size of the array) comparing each pair of elements with indexes I and I+1. If given two elements are not in the order we want them to be, we swap them. Then we increment I by one and repeat the process again until we reach the end of the array. We also keep track of how many swaps we made during the latest walk. After this, we repeat the whole process again until no swaps were done in the latest walk. The following program shows sorting array of eight numbers (entered by user) in the ascending order: | ||
| Sample input and output: | ||
 | ||
Suggested exercises:
| ||
| Sorting string arrays | ||
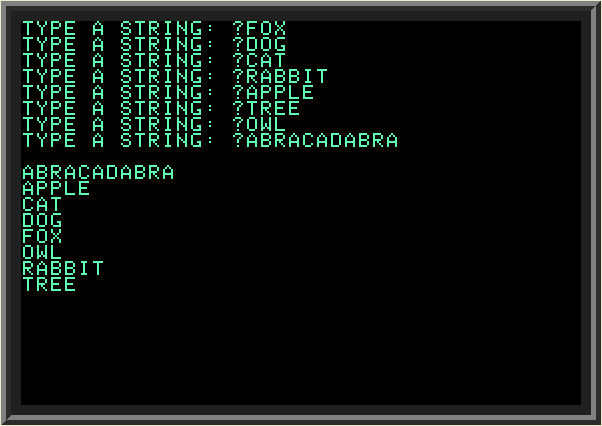
| We can apply the same bubblesort algorithm to sort strings. We declare a string array, enter data and use the same compare operator to compare strings. Strings will be compared alphabetically. Here is the modified program: | ||
 | ||
| Let's try more strings, this time with digits and lowercase letters: | ||
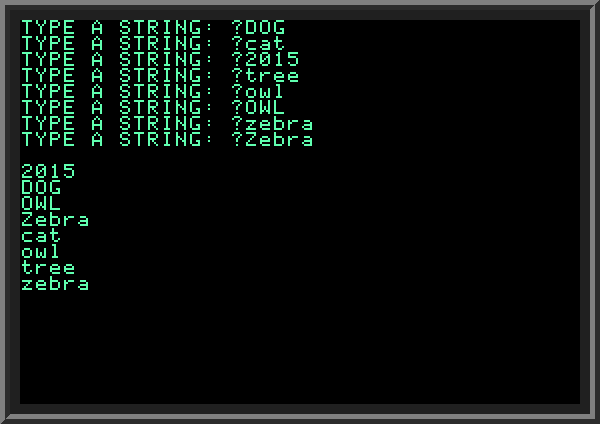 | ||
| As you can see, the string starting with a digit ("2015") is on top of the list, followed by strings starting with uppercase letters, and then followed by all lowercase words. In computer programming string comparison is typically based on comparing the codes (in our case ASCII codes) of the individual symbols, one by one. When comparing two strings, we take first symbols in both strings and compare their ASCII codes; the one with a smaller ASCII code is considered a "smaller" string; in case the first symbols of both strings are the same, we look at the second symbol in each string, and so on, until we find a mismatch.
ASCII codes of digits 0 to 9 are 49 to 57; ASCII codes of uppercase English letters are 65 to 97, and of lowercase letters 97 to 122. This explains the order of strings produced by our program. | ||
| More complex ordering. | ||
| Now, let's make the ordering condition a bit more complex: we will sort an array of strings by string length in ascending order (shortest first). When two strings have the same length, they must be ordered alphabetically as in the earlier example. The following program demonstrates how this is done: | ||
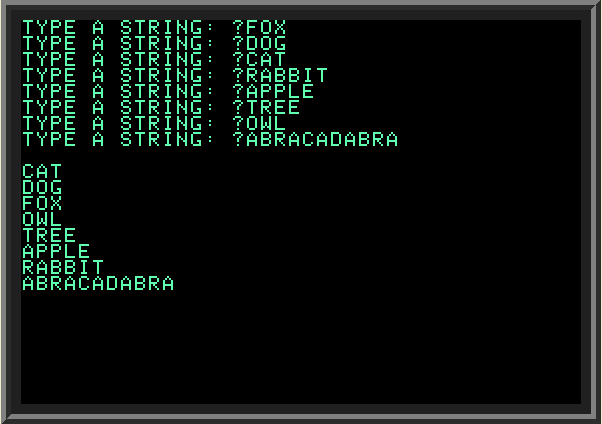 | ||
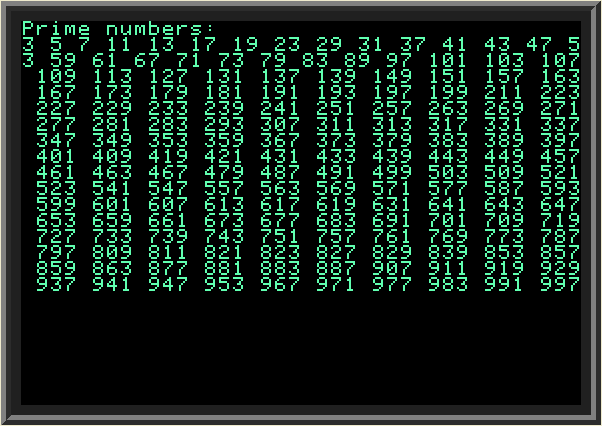
| More math: using arrays for finding prime numbers | ||
| In this lesson, we will use array to construct a Prime sieve, a sequence of all natural numbers up to given N which are prime (divisible only by 1 and itself). A simple (and not very fast) method to accomplish this is to divide every given number K in the range from 1 to N by all integers from 2 to SQR(K) (square root of K) sequentially (until at least one divides K) to determine if it's prime.
In my approach as I test more and more numbers (starting from 2) for being prime, I accumulate information on all prime numbers in the range from 2 to SQR(K-1), where K-1 is previous number we tested, storing them in a special array. Therefore, in order to test next number K for being prime, I divide it by all primes in range 2..SQR(K-1) - which I already know; if none of them divides K, K becomes the next prime we store in my array of primes. | ||
| In the above program I list all primes in range from 3 to N=1000. I also need to decide what should be the size of array (CAP variable) to keep all prime numbers between 1 and N, to avoid overflowing of the array. The rough upper bound is N/3: half of all natural numbers are even and therefore divisible by 2, and one third of all odd numbers is divisible by 3. This leaves us with N/3 of numbers (in range 1..N) which potentially can be prime. For N=1000, we make prime array sized at 340. | ||
 | ||
Suggested exercises:
| ||
| Using DATA to hold static information | ||
|
Sometimes in your program you want to include information which will be used every time the program runs. For example,
in a program showing a calendar, you want to store the names of all 12 months, and also the number of days typically present
in every month. Or in a program playing music, you want to store the sound frequencies for every tune you will be playing.
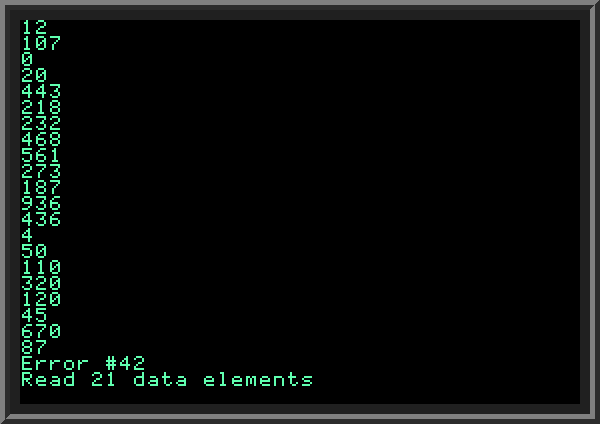
Applesoft BASIC includes a special DATA command which lets you specify numeric or string information the program can read. Every DATA line can hold a number of elements, separated by commas; when you want to include string data with spaces, you should enclose strings in double quotes. The program can have as many DATA lines as you want. To read the data, use READ command, followed by the name of the variable to put the information to (this is similar to INPUT command); the program remembers how many DATA elements it has already read, so each subsequent READ will read the next data element. If you try to call READ after all elements already been read, the program will show error 42 ("End of data"). To reset the data pointer to the beginning of DATA, use RESTORE command. It is not possible to reset the pointer to read the data starting from a specific line: all DATA lines are treated as one chunk of data. | ||
 | ||
|
Sometimes we don't know in advance how many items are present in DATA elements. In this case we can use ONERR to catch the "End of data" error #42 to exit the reading loop, as done in our example. The following snippet shows an example of using DATA to store information into an integer array. First we read all the data, counting how many elements it has in variable C. Then we reset the DATA pointer with RESTORE command (LINE 110), declare an array the size of C (LINE 100), and read all data again (LINES 120..140). Finally, when array is fully initialized we print all elements stored in it (LINES 160..190). | ||
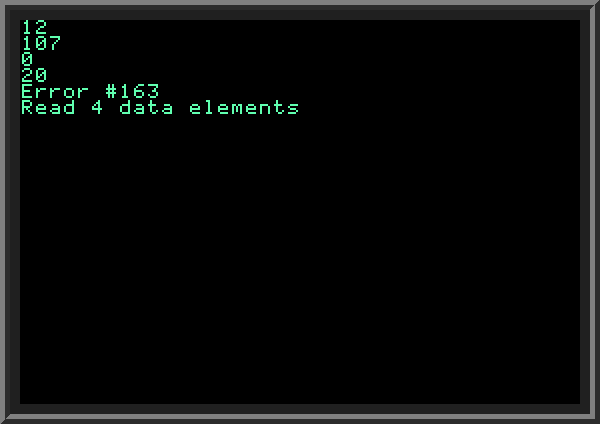
| Initializing arrays in this way is fine when we know that all data in our DATA elements has the same type (in our case they are all numbers). What happens if one of the elements holds a string which cannot be converted to a number? We get error 163 ("Type mismatch") as in the example below. The READ command on LINE 30 tries to put "443A" into a numeric variable N, which causes an error. When using DATA commands, a safer approach is to either group data by types, or read all of them as strings (into string variables) and then convert them as needed. | ||
 | ||
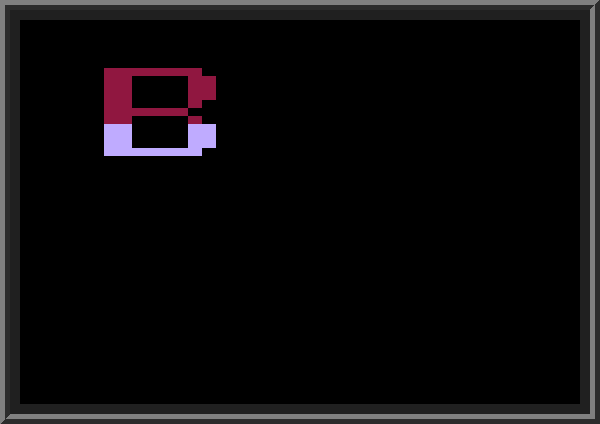
| Let's put DATA commands to some practical use. In the program below we draw uppercase letter B in graphical lo-res mode. We read the information on where to plot points of our letter from DATA lines. They have only 1s and 0s, eight values per line, for better readability. When value we read equals 1, we draw a pixel (LINE 80); otherwise we skip the pixel. There are eleven DATA lines, so our letter will be 8 by 11 pixels high. If you look at LINES 1000..1120 you actually can see our letter B drawn by ones and zeros. | ||
| To make it more entertaining, in this program we draw letter B slowly (look at the delay with FOR loop on LINE 90), line by line, and then change the color of the letter (LINE 150). Techniques like this are used for creating splash screens in games or even regular programs. | ||
 | ||
Suggested exercises:
| ||
| Using simple functions with DEF FN | ||
| AppleSoft BASIC allows one-line functions that take a single argument and return a value with DEF FN command. I should note that all modern languages use functions, and in most of them functions are not restricted in length (they can have as many lines as programmer needs) and can take many arguments. So DEF FN is quite limited by today's standards, but I think it is still useful in some simple cases. The following program demonstrates the use of DEF FN: | ||
 | ||
| The example program declares 2 functions, called POW2 and ROUND on LINES 20 and 30. POW2 returns the power of 2 of the supplied argument; ROUND rounds the decimal argument to the nearest integer (this is not the same as INT function). Note how these functions are called on LINES 50 and 90. You have to call them with "FN" and space preceding the function name.
Function names should not conflict with existing built-in functions. For example, trying to declare FN COSD which returns cosine of argument passed in degrees (as opposed to radians), throws an error, because the first 3 letters in the function name (COS) match the name of the built-in COS function. You should use DCOS as the name, for example, instead. Functions must be declared before they can be used. If you try to use a function before its declaration you will get error 224 ("Undefined function"). | ||
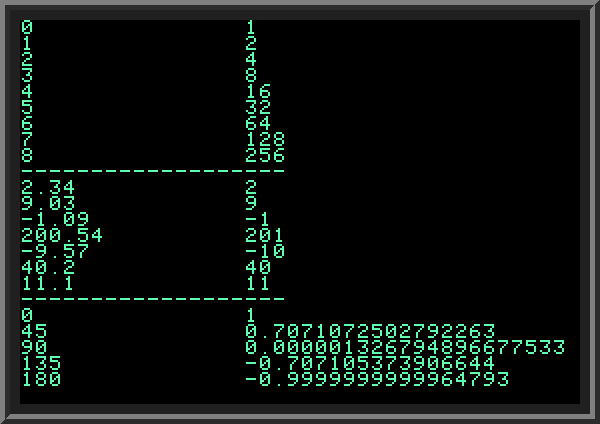
| Printing numbers with given precision. Precision of floating-point calculations. | ||
| In the previous example we included FN ROUND() function to round any argument to the nearest integer. On lines 90..110 we read values from DATA command on LINE 1000, and printed all 7 rounded values.
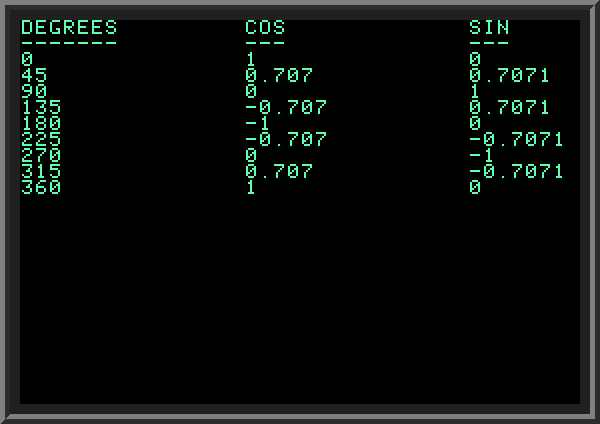
Now look at the last part of the program (LINES 140..160). We output 5 values of cosine function for 0,45,90,135 and 180 degrees. The numbers we get are not very accurate: for example the values for 90 and 180 degrees must be exactly zero and minus one. In part the problem is caused by not very accurate value of PI. In our example it has only 5 digits after decimal point. As a result, values returned by COS will not be very accurate. We can provide more digits after decimal point for PI, however we still will be getting a small error, for 2 reasons: first, PI cannot be accurately represented with fixed number of digits; second, floating-point calculations done by computers have limited accuracy because computers store floating point values only with some limited precision. This is common in all computer languages, not just in BASIC. When printing numeric values that are known to have a limited accuracy, we round them to several digits after decimal point. In many cases we are interested only in two or three digits after decimal point. The following example demonstrates this with printing COS and SIN with 3 and 4 decimal places after comma correspondingly. Note how we multiply the number by 1000 and 10000, then add 0.5 to get the nearest integer, and then divide by the same number (1000 and 10000, correspondingly). The general formula to rounding numbers to N points after decimal point is (A * (10^N) + 0.5)/(10^N). | ||
 | ||
| Random numbers | ||
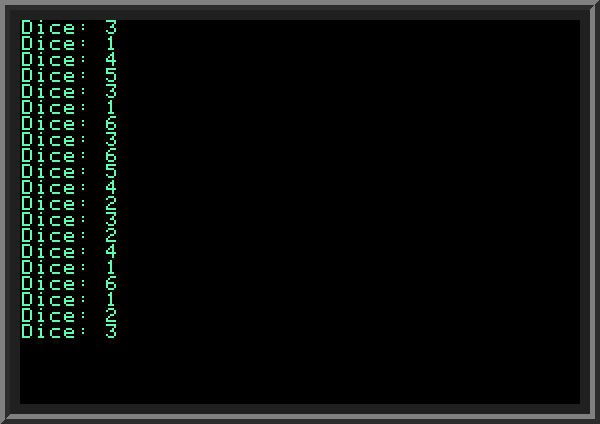
| AppleSoft BASIC RND(1) function generates a pseudo-random number between 0 and 1 (excluding 1). Random numbers are used in games, computer modeling and math applications. Let's look at small program which simulates throwing a dice 20 times, generating values from 1 to 6, and prints the result. | ||
 | ||
| As you run this program again and again, you notice that it generates exactly the same set of numbers every time. The numbers you get from RND(1) function aren't truly random (this is why they are called pseudo-random!): computer uses an algorithm to generate them, and when program restarts, the same algorithm produces the same sequence of values. To make it generate a new sequence, you must re-initialize the random number generator by calling RND with a negative value (called random seed). Each specific value will result in different random number sequence generated afterwards. | ||
| Randomizing random numbers | ||
| So, how do we get a different seed value each time when program starts? Modern languages typically use the value of the current time, in seconds or milliseconds as a way to get a random seed. With Applesoft BASIC we don't have access to current time, so in order to randomize the seed we do the following. We start the program and prompt the user to press any key to continue in a non-blocking fashion. While we wait, we increment a numeric variable in a loop. When user presses a key, the value of the counter (with a minus sign) will be used as random seed. So the time interval between start of the program and the moment when user presses the key serves as the random seed: | ||
| Random numbers can be used to conduct experiments. Below I show a program which throws a dice 4 times, keeping track of the sum of all four throws. In every throw the value ranges from 1 to 6, so the resulting sum of 4 throws can be anywhere between 4 (when all four times we get 1) and 24 (all four times we get 6). But are all results between 4 and 24 equally probable?
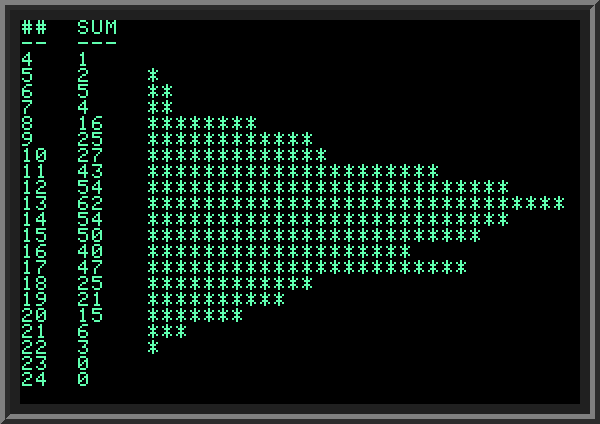
They are not, actually when throwing a dice N times, the most likely sum is 3.5 times N, in our case it is 14. In the program we repeat the experiment 500 times and collect statistics on how many times we get each sum. Then we present this information graphically (though in this case we use 40x24 TEXT mode), using a histogram: | ||
 | ||
|
This program is rather involved, so some explanation is due.
LINES 10..100 initialize the random generator with random SEED using the method described in the previous section. The number of experiments we conduct is controlled on LINE 110 (FOR K.. loop). The total number of different sums we can get ranges from 4 to 24 (inclusive), which makes this total 21. On LINE 105 we declare an array RESULTS which will hold the number of outcomes with a given sum. If we throw a dice four times and sum is 10, we increment array element with index 10-3=7 (The minimum result we can get is 4, in this case we increment element with index 1=4-3. Remember, in BASIC array indexes start with 1). On LINE 120 I call GOSUB 300 which actually conducts the experiment; LINE 130 accumulates the statistic we are interested in: how many times we got each result. Then (LINES 160..270) line by line, I output the accumulated statistic for all 21 possible outcomes. In the first column I print the result index (4 to 24), in the second column I print how many times we got the given sum; then I visually represent this number with a histogram bar drawn with stars across the screen. Because I don't want to print at horizontal positions greater than 40 in 40x24 TEXT mode, I adjust the number of stars per line proportionally so that it does not exceed 30. | ||
Suggested exercise (advanced):
| ||
| Using random numbers to create a screensaver | ||
| To finish the section on random numbers, I show a hi-res graphics program which draws random rectangle outlines on screen.
Every few seconds in erases the screen with new background color and draws a new set of rectangles.
The size of rectangles as well as positions are generated on LINES 40..70. The program uses a GOSUB 1000 (LINE 80) call to update the color C and draw a new rectangle (another GOSUB call on LINE 1070); the BG variable holds the color of the current background color; On LINE 100, after we draw 200 rectangles (counted with CNT variable), we erase the screen with current color "CALL -3072" and reset the CNT back to zero. The subroutine starting on line 200 checks if part of the rectangle falls outside of the screen edges, and all complicated logic there (LINES 2030..2110 and 2130..2210) is about making sure that we stay within the allowed screen coordinates. | ||
 | ||
| Mixing colors in hi-res graphics mode | ||
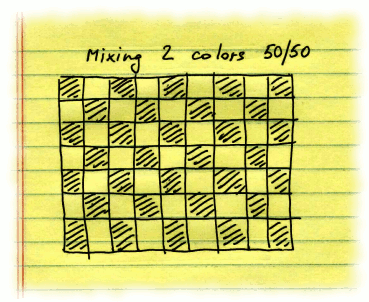
| Applesoft BASIC hi-res mode supports only 8 colors, including black (number zero). Modern computer screens support thousands of colors. Is there a way to make graphics interesting with only 8 colors? One way to deal with this is to mix colors; this is similar to mixing two or more paints to create a new color. For example, to make a rectangle area dark blue, we can make each of its odd rows black and each even row blue. Or, to make it look more refined, have a checkered palette of blue and black. But we are not limited to mixing just 2 colors in 50/50 proportion. | ||
 | ||
| The following program fills display (in hi-res 280x192 pixels mode) with 64 rectangles, each painted with a mix of two colors (index of first is row, index of second is column), with numbers from 0 to 7. The rectangles along the diagonal are filled with solid colors because the two colors we are mixing are the same; also the colors are is symmetrical (second rectangle in the first row has the same color as first rectangle in the second row, and so on). | ||
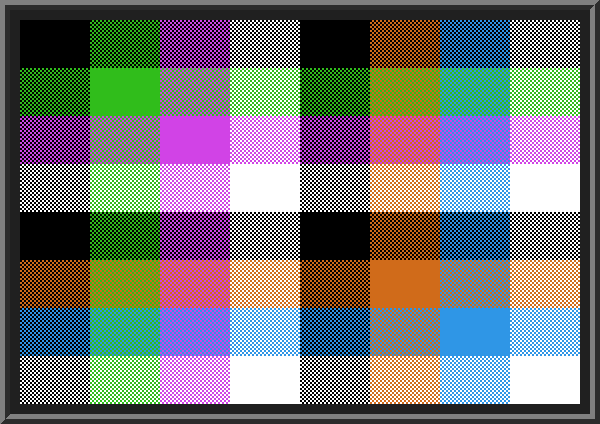 | ||
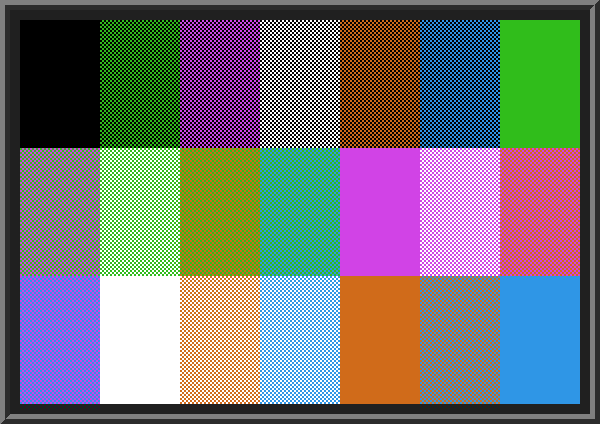
| As you can see from the resulting image, colors 0 and 4 both represent black, and colors 3 and 7 both show white. Which means that we in fact have only six distinct usable solid colors (not eight). How many different colors we can get using a 50/50 mix of 2 colors? We can get 15 different mixes (6*5/2). Along with our distinct solid 6 colors, it makes a total of 21. The following program shows all 21 colors which are either solid or a 50/50 mix of two solids we have. | ||
| The 21 distinct colors we can get by using a 50/50 mix of any 2 (of six), plus six solid colors: | ||
 | ||
| When you run this program you notice that it works much faster than the previous one with 64 rectangles. This is due to the fact that checkered background is drawn not with individual pixels, but by drawing diagonal lines using the two colors we want to mix (see LINES 400..450 and the subroutine starting on LINE 500). Compare this with the slower version by replacing GOSUB 400 on line 70 with GOSUB 200. | ||
| Suggested exercise: modify the program drawing 64 colored boxes (above) to fill boxes in a faster way, by drawing the checkered background with diagonal lines, as shown in the above program with 21 colored areas. | ||
| Recursion (advanced) | ||
| Let's look at a simple program for calculating factorial. Factorial of a natural number N is defined as product of all positive integers from 1 to N, for example 5! (5 factorial) = 1 * 2 * 3 * 4 * 5 = 120. Here's a simple program that calculates factorial using a loop (lines 100..160): | ||
| The factorial of a natural number can also be defined in another way: factorial of natural number N greater than 1 is a product of number N and the factorial of N-1; factorial of 1 equals 1. This is how we can write it in BASIC: | ||
| The two versions of the program differ only on line 130. Version #1 uses GOTO, version #2 calls GOSUB. But this difference is very important: in version #1 we loop through all numbers in one subroutine; in version #2 we call the same subroutine we are already in - and will be using in it a new value of A, until A is greater than zero. The process of making the result of a function (or a subroutine) call
dependent on the call to the same subroutine within it in computer programming is called recursion.
Recursion is a very powerful mechanism which often makes programs simpler. In BASIC the support for recursive calls is limited because subroutines don't pass values on stack (as in many modern languages). We were able to use recursion for computing factorial because this program is quite simple. In more complex cases we can store arguments in an array, provided that we can control the depth of the recursion (the number of times the procedure can call itself). The following program demonstrates how recursive calls can be used to draw Sierpinski carpet (a fractal image). | ||
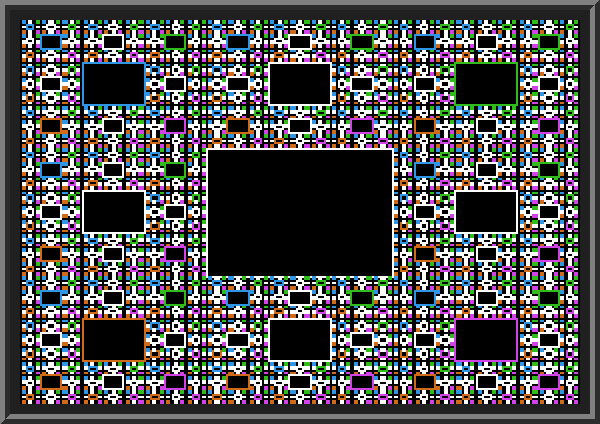 | ||
| It really looks like a carpet, doesn't it?
The program works as follows. The subprogram starting on LINE 100 is the main procedure called recursively. It uses the size (width and height) and the origin (top left coordinate) of a rectangle. In the very first call (which starts all other recursive calls) on LINE 50 this rectangle has the size of the whole screen. We visually divide the rectangle into 9 equal areas, 3 columns and 3 rows. We draw an outline of a smaller rectangle in the middle. Then for all eight remaining rectangle areas (sides of each is 1/3 of the sides of the currently passed rectangle) we call the procedure recursively. Variable C keeps track of how many times we called the procedure recursively: we increment C before each call to GOSUB 100, and decrement C after GOSUB returns. The maximum depth of the recursion is 7. If C exceeds 7, we return from the procedure immediately after it starts (LINE 110). We also return from it if any side of the current rectangle is less than 1 (LINE 110). The fact that we don't allow more than seven recursive calls lets us store all information we need for the current call in four numeric arrays declared on line 30 (for storing width, height, origin X and origin Y). We also use different colors to draw each of the eight rectangle outlines, depending on its relative position: for example top left rectangle outline always uses blue color (HCOLOR call on LINE 230). | ||
| Binary search (advanced) | ||
| Suppose we have an array with following different nine numbers: 9, 50, 23, 90, 77, 6, 12, 48 and 79. Our goal is to find the number among these nine, which is closest to a given number (for example, to number 15). When our array is not sorted (numbers in it are not ordered) we need to look through all elements in array to find the element closest to 15. It means we have to make nine comparisons. The method when we need to check all elements is called linear search. | ||
|
Now imagine that we have the same numbers sorted in the ascending order: 6, 9, 12, 23, 48, 50, 77, 79 and 90. Can we find the number closest to 15 without checking all elements?
A way to do accomplish this is as follows:
| ||
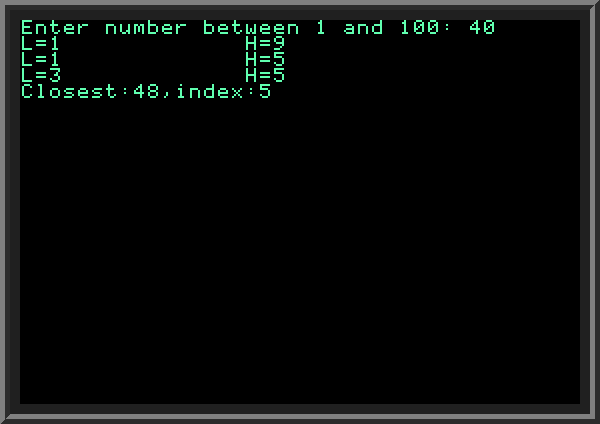 | ||
Suggested exercises:
| ||
| More uses of binary search (advanced) | ||
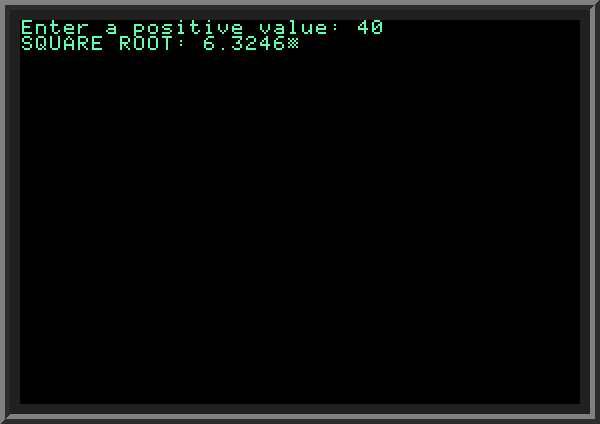
| Binary search can be used to solve some mathematical tasks. For example, it can be used to find values of a function, when we know the value of an inverse function, and know that given function either grows on gets smaller on a given search interval. The square root of a positive X increases as X increases, and we know the value of the square root's inverse function (X squared). This is why we can use binary search to find a value of the square root for any positive X. The following example shows a method for finding a square root of a number. BASIC includes a function SQR, but we pretend for now that it does not exist and we need to find the square root of a number manually.
Note: the square root procedure presented here is for teaching purposes only. There are faster, better ways to compute a square root which are beyond the scope of this tutorial. | ||
| The binary search part of the program is a subroutine at LINES 300..360.
Two variables, L (low) and H (high) control the current interval search limits. On each step we take M, the middle point of the interval and compare M squared to the input value V, and adjust L or H accordingly to the comparison result. We keep dividing the interval until it gets smaller than 0.00001 (LINE 340), when we know the square root of V with precision of no less than 0.00001. At this point we assign M to SQ (the resulting value), and return. Then we print the result with no more than 4 digits after decimal point (our guaranteed precision) on LINE 60.
To make the program more efficient, we separate two cases: when input value V is less than 1; and when V is greater than 1. In the former case we set the initial search range to interval between 0 and 1; in the latter case the search interval is between 1 and T (where T is the number we calculate in another subroutine on LINES 100..220). The subroutine starting at LINE 100 counts number of binary bits of our input number greater than 1. The variable counting the number of binary bits in V is called BITS (line 150). The number with half this number of bits (with some tweaks) can serve as the upper bound T for our search. For example, when V is 40, the number of valid binary bits is 6 (decimal 40 is 101000 in binary format). The number with half the number of this bits plus one is 8 (binary 1000). The initial search interval for square root of V=40 is 1 to 8. Important note:We don't have to call the subroutine at line 100 to determine the upper bound T of the search interval when V > 1. For any V > 1 the value of the square root will be smaller than N, so we can use V itself as the upper bound. At the same time, when V gets large (for example, 10000 and more) using the subroutine at LINE 100 reduces the number of iterations for the binary search very substantially: in case of N=10000 we reduce the span the initial search interval by almost 100 times. | ||
 | ||
Suggested exercises:
| ||
| Useful links: Applesoft BASIC in JavaScript The Applesoft Tutorial Applesoft BASIC Programming Reference Manual | ||
|
| ||
| Yuri Yakimenko, |